Well, better late than never, I have finally finished something for Hels' challenge... She wanted us to go flying, and created a great "industrial" looking piece with planes and maps etc... but I have gone altogether more delicate!!! - oh get her...!!!
Hels said we could choose anything that flew, so I chose butterflies... one on an Elusive Images stamp and the others from my new Martha Stewart punch...
I smooched the tag through a mixture of worn lipsick, spun sugar and bundled sage, then stamped the images in black archival and embossed in clear ep... I love this saying...
The flowers are made from 3" card circles, cut in a spiral with my wiggly scissors (can't think of the name just now, but they cut an irregular edge!!) They are simply curled round and round and stuck...
The MS butterflies are doubled up to give more texture, and the card for them was again smooched through worn lipstick etc..
It's very dimentional and quite pretty - not at all like most of my makes these days!!! The colours are a bit more vibrant in real life, but it was dark when I took the photos and the lights bled out some of the colour...
So there it is... it's quite a large tag, to give me room to put lots of wings on!! Hope she likes it... Thanks for looking... please leave a comment as I love hearing what you all think!!
Love and light
Frankie
xx
I also want to enter this for
Paper Cutz - anything in the sky
CRAFT - butterflies
Crazy Amigos - fly away
DragonsWeb
Welcome to my blog. Please take a look around and enjoy yourself. I hope my work will give you pleasure and inspiration, but please be kind and don't use any of it as your own.
When you have looked, why not leave me a comment, as I value what followers and visitors have to say.
Then pop over to DragonsDream Tag It On and DragonsDarkerSide
When you have looked, why not leave me a comment, as I value what followers and visitors have to say.
Then pop over to DragonsDream Tag It On and DragonsDarkerSide
Saturday, 16 July 2011
Thursday, 14 July 2011
More Crimble in July!!!
Here is a couple more of the DT cards I have made for the Stamp Addicts next show, all details here... I have found it hard to consider such stuff at this time, but lots of people have said it's good for the soul, and that they do it all the time... ahhh!!
Opps!! sorry the camera is so wonky, but the card is straight!!! This ickle bear is a great favourite... he is looking up, and I always felt I had to make him see something... in this one, it is the lovely Bethlehem star. The background was made by stamping the star background stamp in clear ink and clear embossing, then smooching in blue distress ink...
This one has a background of snowflakes, most of which are from the set... I cut the largest one from the centre of one of the sentiment circles, so I could use it independently... After layering up with silver mirri, I added one of the small flakes to his nose!! Aww, cute...
Here are both of them, sitting in their cave with icicles dropping from the ceiling... opps!! The background is the large dots stamped in white acrylic paint and smooched through blue distress inks, and overstamped with a sentiment circle...
So there you have it, another peek at what I have been making... the samples are winging their way to SA Towers, so I hope they like them...
Thanks for looking and commenting - I love hearing what you think
Love and Light
Frankie
xx
Opps!! sorry the camera is so wonky, but the card is straight!!! This ickle bear is a great favourite... he is looking up, and I always felt I had to make him see something... in this one, it is the lovely Bethlehem star. The background was made by stamping the star background stamp in clear ink and clear embossing, then smooching in blue distress ink...
This one has a background of snowflakes, most of which are from the set... I cut the largest one from the centre of one of the sentiment circles, so I could use it independently... After layering up with silver mirri, I added one of the small flakes to his nose!! Aww, cute...
Here are both of them, sitting in their cave with icicles dropping from the ceiling... opps!! The background is the large dots stamped in white acrylic paint and smooched through blue distress inks, and overstamped with a sentiment circle...
So there you have it, another peek at what I have been making... the samples are winging their way to SA Towers, so I hope they like them...
Thanks for looking and commenting - I love hearing what you think
Love and Light
Frankie
xx
Wednesday, 13 July 2011
Project Tim Holtz
I have created a DT piece for TIO and the Stampman this week, and I want to enter it into the Grungy Monday and Simon Says Stamp and Show some stitching challenges.
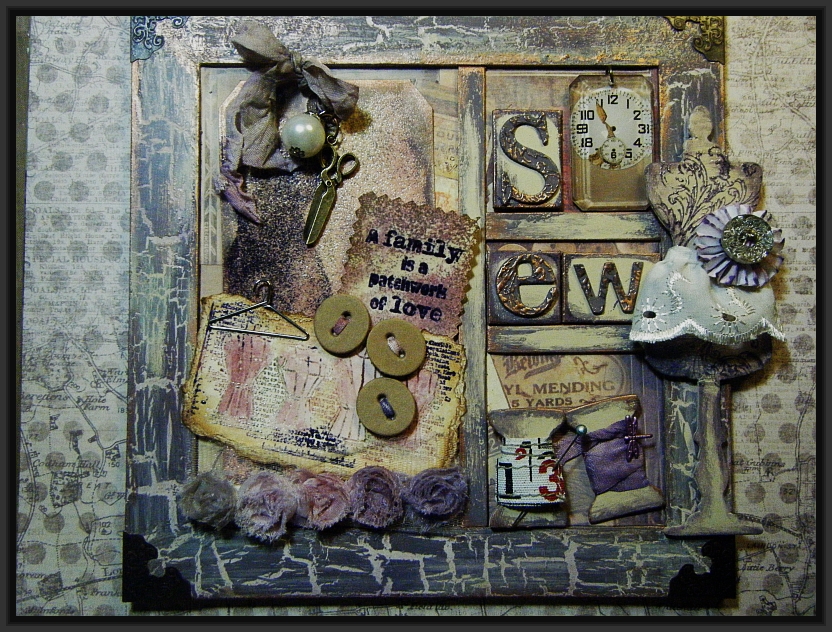
It's all about sewing this week... I really enjoyed making these letters, painted with the fresco finish acrylics in vintage lace and london nights, then stamping and highlighting with vinatge gold rub 'n buff... The clock is from a TH stack, stuck to a clear bauble...
The frame is distressed in a sandwich of vintage lace, pva glue and london nights, rubbed over with trad tan from Claudine Hellmuth. This left side of the piece holds a tag, the bottom of which is adorned with some dyed TH flower border... each one in the colours of the piece, being milled lavender, victorian velvet, dusty concord, pumice and vintage photo...
This photo also show the torn picture of 4 dress forms. The stamp is from Creative Impressions, and I did the other required technique with it, namely stamping with different coloured pads on the same stamp, so I used vv, dc and p... I just painted the forms with a dilute solution of inks, smooched on my craft mat... here is the link to that TH tag technique - check it out, it's fabulous!!!
Here is the whole thing - a square frame, divided by some added strips of the chipboard, to make smaller sections. I cut the TH haberdashery dies from chipboard too and painted them with the fresco finish paints- just must haves!!!
This is a very close up of the dress form, painted, stamped with a TH flourish and embossed in clear ep, as ever!! The broidery anglais edging border "skirt" is the stitching required for SSSS!! Hope it is ok?? The ickle rosette is from a TH die, but cut down a lot and a button added to set it off...
This is the top of the tag, embellished with some dyed seam binding ribbon, a pearl bauble and some ickle scissors, aww!! The texture acquired when doing the TH technique for GM, is very pleasing... I did the whole tag in it, but then overstamped with my home made foam stamp of the dress form, and did the same technique on it...
Here are two cute bobbins painted as before and adorned with some TH measuring tape and some dyed seam binding ribbon... I am LOVIN it... It only came yesterday and it's such a BIG roll... it distresses brilliantly and looks really good... it was a fab investment!!!
This pic shows how dimensional the piece is and how the tag is related to the whole thing. I THOROUGHLY enjoyed this one... a lot more work, but worth it and I shall put it up in my bedroom with the birdie one I did some time ago, which you can see here...
The saying was cut out with my pinking shears and is stamped and embossed in the same technique as the rest of the challenge, and it comes from the same plate as the 4 dress forms one... it's very useful as a set... The buttons are sewn with some of the seam binding ribbon, cut down the centre...
And finally - here is the view of the bottom right corner, again demonstrating how full of texture and dimension the piece is. I hope it bring inspiration to those who see it for the challenges at TIO and Stampman (Friday), and that it fits the bill for the challenges it is entered for...
Thanks for looking, and leaving me your fabulous comment and ideas... I value each one, I promise you...
Love and light
Frankie
xx
It's all about sewing this week... I really enjoyed making these letters, painted with the fresco finish acrylics in vintage lace and london nights, then stamping and highlighting with vinatge gold rub 'n buff... The clock is from a TH stack, stuck to a clear bauble...
The frame is distressed in a sandwich of vintage lace, pva glue and london nights, rubbed over with trad tan from Claudine Hellmuth. This left side of the piece holds a tag, the bottom of which is adorned with some dyed TH flower border... each one in the colours of the piece, being milled lavender, victorian velvet, dusty concord, pumice and vintage photo...
This photo also show the torn picture of 4 dress forms. The stamp is from Creative Impressions, and I did the other required technique with it, namely stamping with different coloured pads on the same stamp, so I used vv, dc and p... I just painted the forms with a dilute solution of inks, smooched on my craft mat... here is the link to that TH tag technique - check it out, it's fabulous!!!
Here is the whole thing - a square frame, divided by some added strips of the chipboard, to make smaller sections. I cut the TH haberdashery dies from chipboard too and painted them with the fresco finish paints- just must haves!!!
This is a very close up of the dress form, painted, stamped with a TH flourish and embossed in clear ep, as ever!! The broidery anglais edging border "skirt" is the stitching required for SSSS!! Hope it is ok?? The ickle rosette is from a TH die, but cut down a lot and a button added to set it off...
This is the top of the tag, embellished with some dyed seam binding ribbon, a pearl bauble and some ickle scissors, aww!! The texture acquired when doing the TH technique for GM, is very pleasing... I did the whole tag in it, but then overstamped with my home made foam stamp of the dress form, and did the same technique on it...
Here are two cute bobbins painted as before and adorned with some TH measuring tape and some dyed seam binding ribbon... I am LOVIN it... It only came yesterday and it's such a BIG roll... it distresses brilliantly and looks really good... it was a fab investment!!!
This pic shows how dimensional the piece is and how the tag is related to the whole thing. I THOROUGHLY enjoyed this one... a lot more work, but worth it and I shall put it up in my bedroom with the birdie one I did some time ago, which you can see here...
The saying was cut out with my pinking shears and is stamped and embossed in the same technique as the rest of the challenge, and it comes from the same plate as the 4 dress forms one... it's very useful as a set... The buttons are sewn with some of the seam binding ribbon, cut down the centre...
And finally - here is the view of the bottom right corner, again demonstrating how full of texture and dimension the piece is. I hope it bring inspiration to those who see it for the challenges at TIO and Stampman (Friday), and that it fits the bill for the challenges it is entered for...
Thanks for looking, and leaving me your fabulous comment and ideas... I value each one, I promise you...
Love and light
Frankie
xx
WOYWW #110 - Tidy?? + Peaking at my Project
Racing along again this week, I can hardly catch my breath ... time to do some I-Spy chez Julia here... I managed a few more assignations again last week, even if one or two were very late!!! But better late than never, and I am still finding it SO interesting...
So this is my space this week!! Those of you who know my desk well, will notice that I have had a considerable tidy up - YES ... THIS is what calls itself tidy in my book!!! I have taken away the notebook computer from the right hand corner and put my punches and other bits and bobs there... it is having problems with getting online, so I shall ditch it, once I am certain I have all the images etc. saved from it... This is the beginnings of my project Tim Holtz for TIO and the Stampman this week...
I painted the last of my frames with a vintage lace, pva glue and london nights acrylic sandwich, then distressed with some Claudine Hellmuth trad tan (fairly new to me but I like it Hels!!!) - just LOVIN those fresco finish paints!!! You can see I get a really great crackle effect with them and the glue...
I filled the inside of the frame with some paper from the TH crowded attic stack... all the haberdashery stuff, cos my theme is sewing this time... here I have cut some pieces from the TH die set, in chipboard, and the cutting mat is out to make some strips for inside the frame, to make it have some smaller sections... The rub 'n buff is out too, as I used it to distress some edges... the paper is painted in a thin layer of trad tan, and all the pieces are painted with it too, bceause it makes a great surface to stamp on...
I like this dress form and I stamped the TH flourish on it in dusty concord, after it was painted, then embossed with clear ep (borrring!!! yawn) ... the rosette is also from a TH die, but I cut it down so it was very small, and added one of his accoutrement buttons to the centre. I shall enter this into the Simon Says Stamp and Show some stitching challenge this week, and here is the very sewing on this lovely broidery anglais border, wrapped to make a skirt.
I shall also enter this in the Grungy Monday challenge this week, where the brief is to use an orange peel /faux rust technique from TH... please go to my Project Tim Holtz post to see all of my piece, how I did it, and the addy for the TH technique...
Here is another ickle sneaky peak, showing my buttons and the words, cut round with my pinking shears, to keep in with the theme... some died seam tape, a pearl bauble and a pair of scissors round off the tag, which sits on the left hand side of the bigger frame...
Hope you enjoyed your visit this week, and that you will look in to my post here, to see the end product... also, pop over to my challenge blog and join in the TIO theme this week - Project Tim Holtz, as I already said!!! Meanwhile have a great week...
Love and light
Frankie
xx
So this is my space this week!! Those of you who know my desk well, will notice that I have had a considerable tidy up - YES ... THIS is what calls itself tidy in my book!!! I have taken away the notebook computer from the right hand corner and put my punches and other bits and bobs there... it is having problems with getting online, so I shall ditch it, once I am certain I have all the images etc. saved from it... This is the beginnings of my project Tim Holtz for TIO and the Stampman this week...
I painted the last of my frames with a vintage lace, pva glue and london nights acrylic sandwich, then distressed with some Claudine Hellmuth trad tan (fairly new to me but I like it Hels!!!) - just LOVIN those fresco finish paints!!! You can see I get a really great crackle effect with them and the glue...
I filled the inside of the frame with some paper from the TH crowded attic stack... all the haberdashery stuff, cos my theme is sewing this time... here I have cut some pieces from the TH die set, in chipboard, and the cutting mat is out to make some strips for inside the frame, to make it have some smaller sections... The rub 'n buff is out too, as I used it to distress some edges... the paper is painted in a thin layer of trad tan, and all the pieces are painted with it too, bceause it makes a great surface to stamp on...
I like this dress form and I stamped the TH flourish on it in dusty concord, after it was painted, then embossed with clear ep (borrring!!! yawn) ... the rosette is also from a TH die, but I cut it down so it was very small, and added one of his accoutrement buttons to the centre. I shall enter this into the Simon Says Stamp and Show some stitching challenge this week, and here is the very sewing on this lovely broidery anglais border, wrapped to make a skirt.
I shall also enter this in the Grungy Monday challenge this week, where the brief is to use an orange peel /faux rust technique from TH... please go to my Project Tim Holtz post to see all of my piece, how I did it, and the addy for the TH technique...
Here is another ickle sneaky peak, showing my buttons and the words, cut round with my pinking shears, to keep in with the theme... some died seam tape, a pearl bauble and a pair of scissors round off the tag, which sits on the left hand side of the bigger frame...
Hope you enjoyed your visit this week, and that you will look in to my post here, to see the end product... also, pop over to my challenge blog and join in the TIO theme this week - Project Tim Holtz, as I already said!!! Meanwhile have a great week...
Love and light
Frankie
xx
Monday, 11 July 2011
DT Pieces for Stamp Addicts
Hi again ... here I am doing something I have NEVER done before!!! Never, ever... and what is that??? I am making Christmas cards!!!!!!! OUCH!!! In the post last weekend, came some pretty ickle new stamps from Stamp Addicts, and yes, they are for Christmas... So I have been making some cards as samples for the next show... That will be July 25th at 4pm.
They have designed some new roundels and I used these to create baubles... the background is silver card, but it looks grey here. There are a lot of these ickle penguins, and I printed one inside an empty roundel, as well as doing the same thing with the star in another...
This one is made of several images, collaged on the scene. I created the background using two of the texture stamps - large and small dots...They are VERY useful... I stamped them in white acrylic paint and dried them, then smooched the whole thing in distress inks - when don't I??!! I tried for some fun pictures in this set of cards, and this is one of them - I just wonder where that ickle skiing guy is going to land!!???
So that's it for now... had some fun doing these and I have some more to show you later in the week... The stamps will not be available until the show later in the month... Off to get inky now, and finish my "Project Tim Holtz" for TIO on Wednesday and Stampman on Friday... it's a biggy again, with a tag attached... Hope you will come back soon to see the next installment and please leave a comment, as I love to know what you are thinking...
Love and light
Frankie
xx
They have designed some new roundels and I used these to create baubles... the background is silver card, but it looks grey here. There are a lot of these ickle penguins, and I printed one inside an empty roundel, as well as doing the same thing with the star in another...
This one is made of several images, collaged on the scene. I created the background using two of the texture stamps - large and small dots...They are VERY useful... I stamped them in white acrylic paint and dried them, then smooched the whole thing in distress inks - when don't I??!! I tried for some fun pictures in this set of cards, and this is one of them - I just wonder where that ickle skiing guy is going to land!!???
So that's it for now... had some fun doing these and I have some more to show you later in the week... The stamps will not be available until the show later in the month... Off to get inky now, and finish my "Project Tim Holtz" for TIO on Wednesday and Stampman on Friday... it's a biggy again, with a tag attached... Hope you will come back soon to see the next installment and please leave a comment, as I love to know what you are thinking...
Love and light
Frankie
xx
Thursday, 7 July 2011
Singing in the Rain??
I have managed a session with my inks today, and have made a piece for a couple of challenges - oh yes... bundled together again, but I am actually enjoying the discipline of taking the rules from different places and linking them into my piece.
I went with my daughter to a meeting today, and it was pouring with rain, so my piece had to be the rain man... so I started with that and built from there... the words were also important, and they were on a new sheet of TH sayings.... I cut him out of a piece of kraft paper and inked him with blues distress inks...
Here it is as a whole view. My challenges are going to be
Simon Says Stamp and Show - a flourish
Sunday Stampers - writing
Grungy Monday - resist technique by TH
The piece is full of texture - mainly from the use of the white paint dabber on a dots stamp from TH. When dry, I sprayed with some home made spritzes, as demanded by the TH technique, then aged with vintage photo round the edges.
This frilly edge is made with musical tissue tape, fastened to a thin stip of blue ribbon. The rosette also has music on it, cos the man is singing and dancing in the rain!!
A TH flourish is stamped all round the edges and embossed with clear ep - what a surprise!! Below, you can see the dotty texture from the white paint resist... it is very pleasing as a background... very tactile... I also daubed some rub and buff in gold, round all the edges for a highlight.
So there we have it... the finished piece... I am quite pleased with it, and happy with the texture... and of course, I love this umbrella man, he is so versatile...
I will also add this to the following
Everybody-Art-Challenge - use shapes
Riley &Co - dies and punches
Thanks for coming over and having a look... Please leave a comment as I truly value your opinions...
Love and Light
Frankie
xx
I went with my daughter to a meeting today, and it was pouring with rain, so my piece had to be the rain man... so I started with that and built from there... the words were also important, and they were on a new sheet of TH sayings.... I cut him out of a piece of kraft paper and inked him with blues distress inks...
Here it is as a whole view. My challenges are going to be
Simon Says Stamp and Show - a flourish
Sunday Stampers - writing
Grungy Monday - resist technique by TH
The piece is full of texture - mainly from the use of the white paint dabber on a dots stamp from TH. When dry, I sprayed with some home made spritzes, as demanded by the TH technique, then aged with vintage photo round the edges.
This frilly edge is made with musical tissue tape, fastened to a thin stip of blue ribbon. The rosette also has music on it, cos the man is singing and dancing in the rain!!
A TH flourish is stamped all round the edges and embossed with clear ep - what a surprise!! Below, you can see the dotty texture from the white paint resist... it is very pleasing as a background... very tactile... I also daubed some rub and buff in gold, round all the edges for a highlight.
So there we have it... the finished piece... I am quite pleased with it, and happy with the texture... and of course, I love this umbrella man, he is so versatile...
I will also add this to the following
Everybody-Art-Challenge - use shapes
Riley &Co - dies and punches
Thanks for coming over and having a look... Please leave a comment as I truly value your opinions...
Love and Light
Frankie
xx
Wednesday, 6 July 2011
WOYWW #109 - A Pressie from Neil + My TIO Tag
Where are the wings??? For the year, that is, tee hee... I can't believe we are already into July and another WOYWW Wednesday!!! I am sure there is more than 1 in each week!!! And why are Wednesdays, so important?? 2 main reasons really - TIO challenge and sharing desks and work with the world c/o the fabulous Julia at Stamping Ground...
Above you can see my alcohol inks out from last weeks' challenges at Stampman and Grungy Monday. You can also spy a new tool - a chobbler for rounding edges...
I have been sorting out my Tim Holtz pieces and adding to my stash, with more metal bits and some new stamps. These boxes are just a couple that I keep my things in..
And right here at the front, my Fresco paints... I love them. They have such a great finish. There is also one of my stains... don't have many of them, but I expect I will get a few more eventually... Now how lucky am I??? Just look here...
You might remember there was a mix up on WOYWW anniversary swap week, and my partner did not make an actual thing... well, a couple of wonderful people made things for me, and one of them was the VERY talented Neil, who made me this lovely book, with this fabulous stamped cover...
The background is beautifully crackle stamped, and this TH birdie is so delicate. It is softly grunged round the edges and I am lovin it!!
I think this is wax, stamped into whilst hot...
And this is the inside of that tiny card, with such a lovely message... I have only just shown this because it came whilst I was in Venice, then the stuff with my mum made me forget to show it... so here it is now and thanks a whole bunch, Neil, I am so pleased and grateful for you sending it!!! - and finally...
Frankie
xx
Above you can see my alcohol inks out from last weeks' challenges at Stampman and Grungy Monday. You can also spy a new tool - a chobbler for rounding edges...
I have been sorting out my Tim Holtz pieces and adding to my stash, with more metal bits and some new stamps. These boxes are just a couple that I keep my things in..
And right here at the front, my Fresco paints... I love them. They have such a great finish. There is also one of my stains... don't have many of them, but I expect I will get a few more eventually... Now how lucky am I??? Just look here...
You might remember there was a mix up on WOYWW anniversary swap week, and my partner did not make an actual thing... well, a couple of wonderful people made things for me, and one of them was the VERY talented Neil, who made me this lovely book, with this fabulous stamped cover...
The background is beautifully crackle stamped, and this TH birdie is so delicate. It is softly grunged round the edges and I am lovin it!!
I think this is wax, stamped into whilst hot...
And this is the inside of that tiny card, with such a lovely message... I have only just shown this because it came whilst I was in Venice, then the stuff with my mum made me forget to show it... so here it is now and thanks a whole bunch, Neil, I am so pleased and grateful for you sending it!!! - and finally...
Here is a tiny detail of my TIO tag for this week, available to view over at DragonsDreamTIO, or in much more detail on this blog, here. The theme this week is The Age of Chivalry, so if you want to join in, just pop over and have a look...
I hope you have a lovely week, and get to do what you want to do...
Love and LightFrankie
xx
Tuesday, 5 July 2011
#109 TIO Tag - The Age of Chivalry
Well, here is another Wednesday, and here is another TIO challenge... I LOVE my teams' work and support, but they DO keep on challenging me these days!!! The Age of Chivalry is a wonderful theme, but I had very little to work with, so this is what I came up with...
I thought of crowns and Fleur de Lys, chain mail and golden cord...
I am loving to use metal decoration and, like last week, again I used an on the edge die...one to echo the fleur de lys... see also the lions. These are from TH, stamped in red brick, and embossed in clear ep...as always!!
Here is the full tag. I used red brick, spiced marmalade and scattered straw distress inks, smooched on the craft sheet and mixed. I stamped in archieval black and used clear ep. The large stamp and the crown are from a plate by Elusive Images. There is a crafty individuals script along the right side stamped in vintage photo... my layering again...
The left side has the word "knight" in TH grunge board letters, coloured with fired brick and touched with gold pen...
I LOVE the texture of this middle section, with the diamonds, fleur de lys and lions. Actually I like the whole tag and it did not really take me too long today!!! Often I faff about, but it all came together well this time...
Off to do more inkyness now for Simon Says, Sunday Stamper and Grungy Monday... and anything else I can find... Thanks for coming over to look and to leave your great comments... I do appreciate you taking the time...
Love and Light
Frankie
xx
I thought of crowns and Fleur de Lys, chain mail and golden cord...
I am loving to use metal decoration and, like last week, again I used an on the edge die...one to echo the fleur de lys... see also the lions. These are from TH, stamped in red brick, and embossed in clear ep...as always!!
Here is the full tag. I used red brick, spiced marmalade and scattered straw distress inks, smooched on the craft sheet and mixed. I stamped in archieval black and used clear ep. The large stamp and the crown are from a plate by Elusive Images. There is a crafty individuals script along the right side stamped in vintage photo... my layering again...
The left side has the word "knight" in TH grunge board letters, coloured with fired brick and touched with gold pen...
I LOVE the texture of this middle section, with the diamonds, fleur de lys and lions. Actually I like the whole tag and it did not really take me too long today!!! Often I faff about, but it all came together well this time...
Off to do more inkyness now for Simon Says, Sunday Stamper and Grungy Monday... and anything else I can find... Thanks for coming over to look and to leave your great comments... I do appreciate you taking the time...
Love and Light
Frankie
xx
Thursday, 30 June 2011
Artist!! - Taking on the Challenges
I have limited time at the moment as I have told you before, so I am rolling some challenges in together today... they fit perfectly anyway, so it's no hardship!! Normally, I am not chuffed when too many are rolled into one, but needs must, and I think I have kept them true to the individual premise -oooo, get her!!!
So what are they I hear you cry??? as follows, I reply...
Stampman - alcohol inks + optional sketch (my DT piece)
Simon Says Stamp and Show - a word
Ink on my Fingers - words
Grungy Monday - alcohol inks
The Artistic Stamper - hot colours
So that's what I have done... words and alcohol inks in hot colours...
I used shiny card, pool, rose and latte with my tool, and splodged, as you do!!!. Then I dropped some dots of each colour, after blending, and some blending solution to move the inks around... the rosettes are also dribbled with them, in two colours... they are made from TH kraft paper and the resist shows through really well as you can see below... Linda at Studio L3, showed us this link for inspiration... Tim himself, demoing...
I stamped images from TH sheets, in archieval black and embossed in clear ep - well when DON'T I do that??? Then I began my layering which is my favourite to do... using a Craft Individuals word stamp in vintage photo, TH clocks in rusty hinge, pen nibs and diddy ickle clocks in black soot and so on.
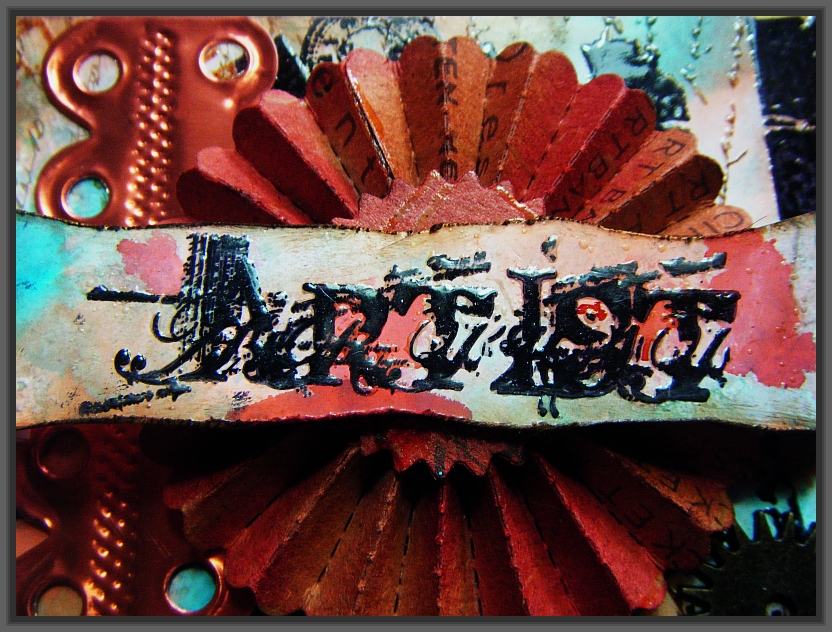
My word was ARTIST... a bit pretentious perhaps?? but I was feeling a bit arty at the time!! I printed it in the black, on a cut off piece from my original background make, then distressed it with a TH distresser tool. It seemed to cry out for a banner, and I DID get the idea from Hels Sheridan, I cannot tell a lie!!! So it was fixed upon the larger rosette, to tell it's message...
I used a bit of metal too, cut in my Vagabond with a TH on the edge die, and decorated with a wheel from the starter, basic set. This fat bead is made from friendly plastic - I thought I might as well go for broke on all the media I was using!! tee hee...
The whole thing is finished off with a bit of hardware, in the form of gears, cogs and spinner, all from TH of course!! The tag is very 3D, and very tactile, with all that thick ep and card rosettes - I still really love these, especially the smaller one with a die cut button from the TH sewing die...
So there it is, my 4 for the price of 1!!! - I am very stingey this week, but needs must. Hopefully the phone calls will diminish once mum settles a bit... at the moment she is so confused and fed up, she keeps blaming me then putting the phone down on me... that makes me so mad!!!
I was out getting some fish and chips last night, and she must have left a message, cos she was VERY cross because I was not in, and moaned because I was " not giving her any support whatsoever" and said that "the daughter does not love her mother".... ooooo she made me cross, but I shall just have to get used to it I suppose...
Anyway, less of that and more of a thanks to you who keep popping in to look at what I do. I am very grateful for your coming over and leaving me your wonderful comments... and just look to the right... as I write this I am not far at all, from my 25,000 visitors... come on!! put me over that magical number!!
Love and light
Frankie
xx
PS - hurrah we did it!!! we got over the 25,000 today, 1st July!!! Thanks people... xx
So what are they I hear you cry??? as follows, I reply...
Stampman - alcohol inks + optional sketch (my DT piece)
Simon Says Stamp and Show - a word
Ink on my Fingers - words
Grungy Monday - alcohol inks
The Artistic Stamper - hot colours
So that's what I have done... words and alcohol inks in hot colours...
I used shiny card, pool, rose and latte with my tool, and splodged, as you do!!!. Then I dropped some dots of each colour, after blending, and some blending solution to move the inks around... the rosettes are also dribbled with them, in two colours... they are made from TH kraft paper and the resist shows through really well as you can see below... Linda at Studio L3, showed us this link for inspiration... Tim himself, demoing...
I stamped images from TH sheets, in archieval black and embossed in clear ep - well when DON'T I do that??? Then I began my layering which is my favourite to do... using a Craft Individuals word stamp in vintage photo, TH clocks in rusty hinge, pen nibs and diddy ickle clocks in black soot and so on.
My word was ARTIST... a bit pretentious perhaps?? but I was feeling a bit arty at the time!! I printed it in the black, on a cut off piece from my original background make, then distressed it with a TH distresser tool. It seemed to cry out for a banner, and I DID get the idea from Hels Sheridan, I cannot tell a lie!!! So it was fixed upon the larger rosette, to tell it's message...
I used a bit of metal too, cut in my Vagabond with a TH on the edge die, and decorated with a wheel from the starter, basic set. This fat bead is made from friendly plastic - I thought I might as well go for broke on all the media I was using!! tee hee...
The whole thing is finished off with a bit of hardware, in the form of gears, cogs and spinner, all from TH of course!! The tag is very 3D, and very tactile, with all that thick ep and card rosettes - I still really love these, especially the smaller one with a die cut button from the TH sewing die...
So there it is, my 4 for the price of 1!!! - I am very stingey this week, but needs must. Hopefully the phone calls will diminish once mum settles a bit... at the moment she is so confused and fed up, she keeps blaming me then putting the phone down on me... that makes me so mad!!!
I was out getting some fish and chips last night, and she must have left a message, cos she was VERY cross because I was not in, and moaned because I was " not giving her any support whatsoever" and said that "the daughter does not love her mother".... ooooo she made me cross, but I shall just have to get used to it I suppose...
Anyway, less of that and more of a thanks to you who keep popping in to look at what I do. I am very grateful for your coming over and leaving me your wonderful comments... and just look to the right... as I write this I am not far at all, from my 25,000 visitors... come on!! put me over that magical number!!
Love and light
Frankie
xx
PS - hurrah we did it!!! we got over the 25,000 today, 1st July!!! Thanks people... xx
Subscribe to:
Posts (Atom)